


How to set up an online booking system on your website?
Taking your business online can seem like an easy enough task, to begin with. You set up your website, nurture your social media profiles, and map out a strategy to direct people to your website.
And that's when it gets a little tricky. You need to sell effectively once people visit your website. Right from displaying your services to optimizing your booking page, you need to make sure every element on your site is optimized to generate more conversions.
The reason this is so tricky? Not only do you need to ensure safe payments and design the layout meticulously, but you also need to ensure people can find the services they are looking for instantly. The best way that you can do this is with a booking system that takes care of all your booking and scheduling work for you. This will free you up to focus more closely on your services and their quality while providing a simple and easy-to-navigate interface to visitors and encouraging more conversions.
What is an online booking system?
An online booking system allows your customers to book your services from their own computers or mobile phones through a web application and helps you manage your bookings, schedules, and automated communication with your customers.

An online booking system will simplify your back-end operations as people book appointments or services with you and provide a fast and simple system for your customers.
How does an online booking system work?
An online booking system receives and processes booking requests via a cloud-based platform that stores and synchronizes staff and customer data as well as service schedules on both ends. Customers are able to view open slots on the calendar in real-time, while your staff also has access to each team member's schedule.
An online booking system provides a higher level of data security as everything is stored in a secure database. Team access to this database can be controlled by the administrator, ensuring safe and transparent data management.
If you create an online booking system on your website, you can free up your staff on the operations end with automated processes and real-time updates on any changes to bookings or schedules.
Key features of an online booking system:
- Booking Site with Custom Filters
- Lead capture form
- Account and membership management
- Secure payment gateway integration
- Synchronized, real-time calendars
- Wait-list management
- Business analytics tools
- iframe widget
- Team management
- Discount management
- Automated communication tools
- Check-ins and Attendance Tracking
Competitive online booking systems are designed with features that help streamline your operations and manage members, waitlists, payments, sales, and communication with your customers.
A good booking system will also help you improve the customer experience through automation and smarter communication.

Switching your operations to an online booking system will ultimately allow you to optimize your business and drive growth through smart insights and real-time updating of customer data.
But when you have an established online presence, it would be important for you to be able to integrate this online booking system on your website. Just one simple addition would attract more people to your website and increase your conversions at the same time!
Integrating an online booking system on your website
There are a number of ways through which you could integrate a booking system on your website. You could write up your own custom code if you have the expertise or are willing to invest the time and resources for it.
You could look at relatively simpler options like plugins and API integrations. But perhaps the best solution is an iframe widget that adds a booking system to your website. A few quick steps will not only improve customer experience on your website but ultimately help you streamline your services and deliver a higher quality of service to your customers!
What is an iframe widget?
An <iframe> tag adds an inline frame that is used to host an external booking system on your website. It will allow visitors to your site to view slot availability in real-time, pick the service and timing of their choice, and make payments through secure gateways.
Using an iframe widget is ideal for the simplicity of the process. It can be added instantly and as your users find the booking system on your website, it helps you push up traffic and the average time people spend on your site.
How to add an iframe widget to your website
Step 1: Set up your booking system
Step 2: List your services and appointments
Step 3: Personalize your booking site
Step 4: Create a custom form to collect data
Step 5: Set up your payment gateway
Step 6: Add the iframe widget code to your website
Step 7: Enable booking notifications
To see how we can add an iframe widget, let's take the case of a small, hypothetical business named FitLyf Studio, founded by Derek Adams, a young fitness entrepreneur. FitLyf is based in the town of Glendale, AZ and offers a variety of fitness and wellness courses both online and offline at their studio.
FitLyf is a fairly popular option for the people of Glendale and the studio has also been receiving decent responses from across the country for their online courses. Their new website has slowly started to bring in new leads and is encouraging the team to expand these courses and build a steady foundation.
So far, the studio has been taking down reservations at their front desk and sending out schedules manually. But with more leads coming from online channels, it only made sense for FitLyf to create a streamlined booking process on their website. This way, people could easily pick a slot for the class they wanted no matter where they were located and view class availability in real-time.
FitLyf chose Omnify as their fitness studio software. With an easy-to-use interface, a customizable booking page, and the ability to support secure payment gateways, Omnify was tailored to help FitLyf establish their booking system.
Let us take a step-by-step look at how Derek used Omnify to set up an iframe booking widget on their website to enable online bookings and appointment scheduling.
Step 1: Set up your booking system
Once Derek subscribed to Omnify and logged in, he first filled out the business details for FitLyf.
- He finds Settings on the left navigation on the dashboard.
- Goes to General under Business Settings
- Clicks on Business Details and fills out the form with FitLyf Studio's Name, Contact Details, Currency and Time Zone
- He then clicks on Address and enters the studio's location and details in the forms provided.
Step 2: List your services and appointments
Once Derek adds the studio's information, it is time to list all of his team's services. FitLyf provides a variety of classes, ranging from core fitness training at every level to pilates and yoga classes through expert instructors. The studio also offers fitness consultations and exercise room rentals during the weekdays.
He needs to make sure people who are looking for each of these services, appointments, and facility rentals are able to find them without having to scroll through a bunch of other options that have no connection to what they're looking for!
Derek starts by going to Services on the left navigation. He finds a variety of options that can be added to Omnify’s booking site.
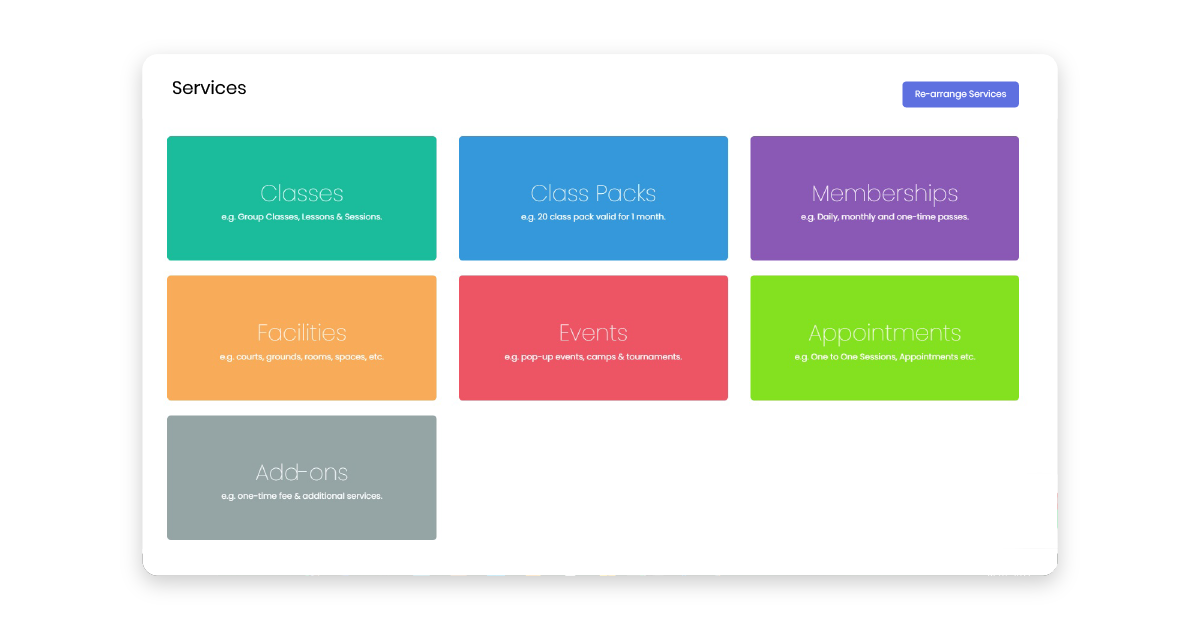
- Classes: Help Derek add each of his regular services in the form of timed classes with 25 to 50 slots depending on their popularity.
- Classpacks: These help Derek set up monthly crossfit programs and themed yoga courses for people looking to pick up something in the long term.
- Memberships: Allow Derek to create special membership packages with varying benefits to attract and retain more customers.
- Facilities: The studio's facilities including exercise rooms and locker rooms can be rented out for fixed periods of time through this feature.
- Events: Perfect for Derek and the team to host special sessions, invite fitness influencers, and conduct exciting events that generate a buzz around the studio.
- Appointments: All the personal training appointments and consultations go here, allowing FitLyf to provide personalized services to their customers.
- Add-ons: If FitLyf has any equipment to rent or accessories to sell to their customers, it can be done using Add-ons.
Derek chooses classes and enters the following details for a daily class on core fitness training:
- Name of the class
- Brief description
- A cover image
- Location or Zoom URL for online class
- Trainer
- Schedule details
- Frequency of classes
- Class capacity
- Pricing
- Booking, cancellation, and refund options
- Filter tags
The Filter Tags Derek applies to the classes will ultimately come in handy when he needs to sort the classes by type on the studio’s service store.
He repeats this process with all his Classes, Classpacks, and Appointments and sets up his Membership plans. He sets up a week-long Event at the studio to celebrate the launch of their new booking system by tying up with a local influencer to take a short, yet intensive training course for 50 of his customers. He also lists his two training rooms for rent.
Step 3: Personalize your booking site
Once FitLyf Studio's services are live on the booking site, Derek needs to ensure that the site matches his website's branding.
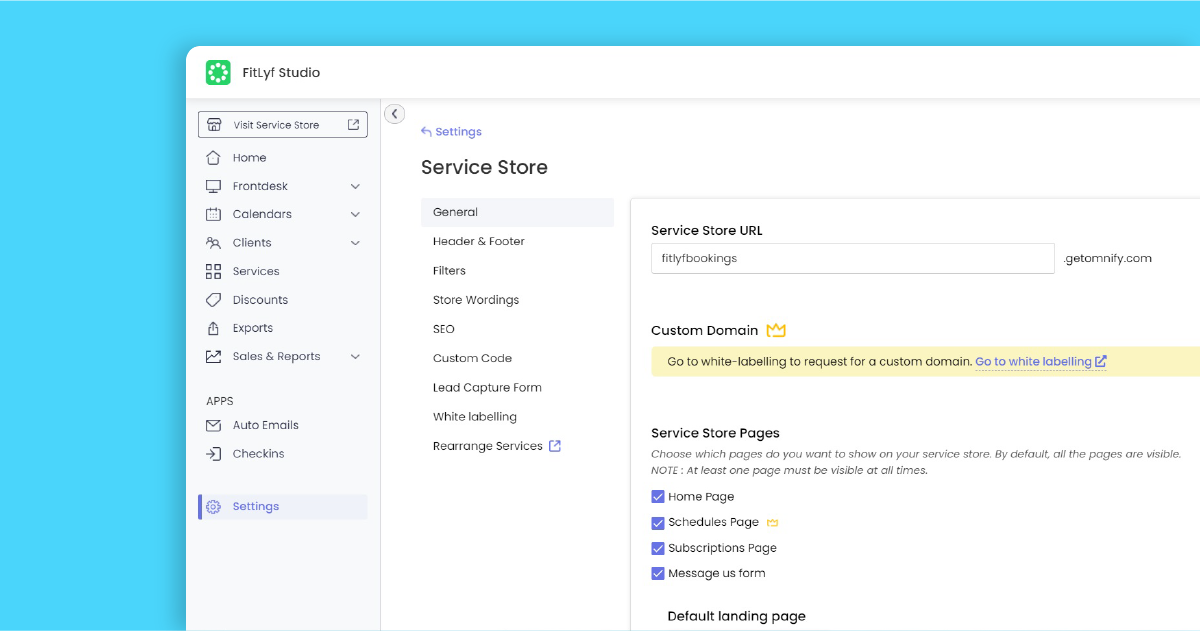
- He goes to Settings and selects the Service Store option under Online Store.
- In General settings, he changes the Service Store URL, chooses which Pages can be displayed on the store, and the Primary Color for the store.
- For the Header & Footer, Derek adds the FitLyf logo, customizes the buttons, adds links to his social profiles, and chooses to display contact details on the booking page.
- He verifies the Filter Tags added to his services earlier and makes sure they are effective in categorizing the studio's offerings.
- Derek can change how his classes and appointments are labelled under the Store Wordings option, so his customers can easily identify and book the service they're looking for.
- Derek can also optimize his booking page for search engines and add a Lead Capture Form to the page to gather leads from visitors who land on the booking site.
Step 4: Create a custom form to collect data
Having only reopened the studio again a few months ago this year, Derek is still cautious about COVID-19 safety for his staff and customers. Derek has ensured his team is vaccinated by now, but quite a few of his customers are yet to be fully vaccinated. To trace potential infection at the studio, Derek decides to set up a self-declaration form that collects each customer's travel information and vaccination status before they can complete their booking.
- To set up a Custom Form, Derek goes back to Settings and selects Custom Fields under Bookings & Payments.
- He decides to add the form Before Booking and selects the customizable template for COVID-19 self-declaration. The form asks for details on travel, potential contact with infected individuals, and possible symptoms of COVID-19.
- There he can add or remove fields based on the information he would like to collect from his customers, such as vaccination status or history of infection.

Derek can also create other forms to collect information from visitors on the Signup Page or After Booking. He can also allow his customers to add details of their Family Members so they can avail FitLyf's services through the customer's account.
Step 5: Set up your payment gateway
To complete the booking system, Derek needs to set up secure payment gateways for his customers.
- He returns to Settings from the left navigation and selects Payments under Bookings & Payments.
- Here he can choose between Stripe and PayPal, among other options.

Once Derek connects the payments account, FitLyf's booking system is ready to accept bookings for services displayed on the service store.
Step 6: Add the iframe widget code to your website
Once Derek connects the payment gateway, it is time to embed the iframe widget of FitLyf's booking system onto their website.
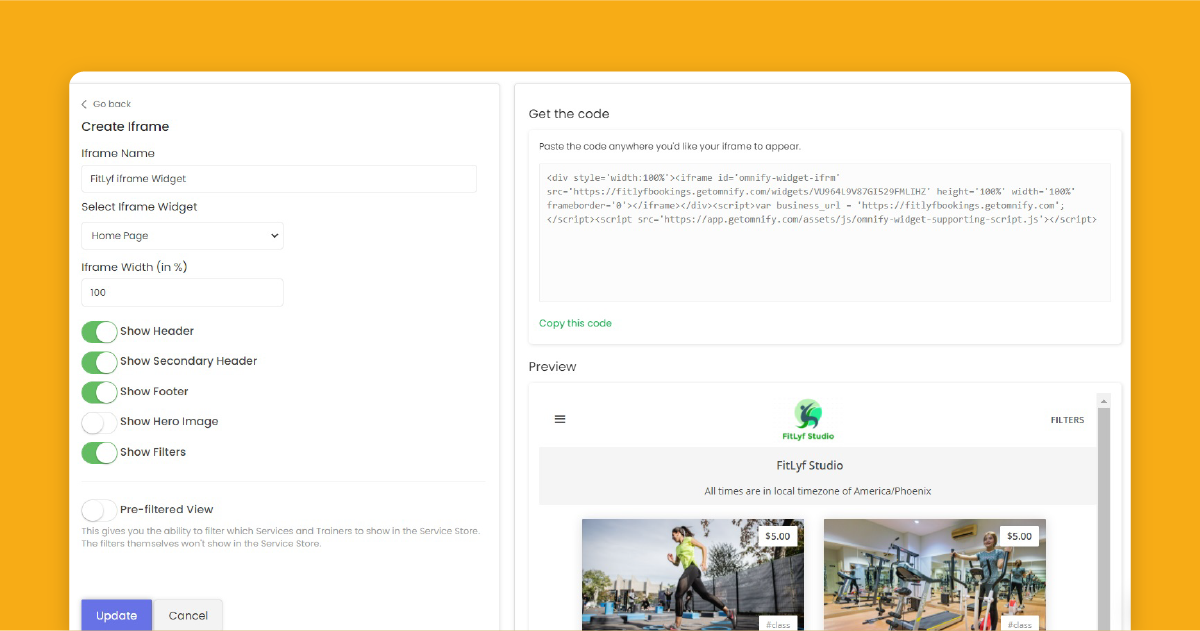
- He goes back to Settings and selects Widgets under Online Store.
- There, he finds options to create an iframe or a button to embed on the studio's website.
- He chooses to create an iframe. He names it "FitLyf iframe Widget" and chooses to display the Home Page.
- Derek assigns a frame width of 100% and clicks Create to generate a preview and an embed code.
- He copies the code and pastes it in the source code of the studio's website.
The Service Store with all of FitLyf Studio's Classes, Classpacks, Appointments, Events, Memberships, and Facility Rentals will then be available for visitors to book from the studio's website.
Step 7: Enable booking notifications
Finally, Derek needs to activate automated communication with his customers throughout the booking journey and provide a personal touch to the visitor experience.
- Derek selects Auto Emails from the left navigation.
- There are a number of email options available, from account-related emails to payment reminders and booking updates.
- He has the option to activate or deactivate each of these and edit each message to personalize it for his audience.

Ready to grow!
Now that Derek has set up a booking system for the studio's website, he can expect streamlined booking operations, improved customer experience, and higher retention of customers in the long run.
Do you feel your business is ready to grow to the next level but all that you're missing are the right tools to sustain your efforts? Choose Omnify's online booking software and simplify your operations across the cycle. Free yourself up to drive long term growth with a robust platform and smart insights powering your efforts!
Find out how Omnify is the best online booking solution for your services and begin your journey of growth. Start you FREE TRIAL today!
Related Readings:
Follow these simple steps to set up an online booking system on your website using Omnify’s iframe widget.


